Let’s be honest, color ink is expensive. If you’ve ever glanced at your HP printer’s ink levels and felt a quiet sense of dread, you’re not alone. Color cartridges drain faster than you’d expect, especially if your printer is quietly defaulting to color mode even when you’re printing a plain text document or a basic spreadsheet.
The good news? You can easily tell your HP printer to stop using color ink altogether and stick strictly to black and white. Whether you want to conserve your color cartridges, save money, or simply don’t need color for your everyday printing tasks, this guide walks you through every method available, from your Windows or Mac settings to the HP printer software itself.
Let’s dive in.
Why Would You Want to Print Only in Black and White?
Before jumping to the how-to steps, it’s worth understanding why this setting matters. A lot of people don’t realize that even when they’re printing a black-and-white document, their HP printer might still be dipping into color cartridges in the background. This is because many printers mix color inks to produce a richer-looking black tone, something called “composite black,” rather than using the dedicated black cartridge alone.
When you force the printer to use black and white only, it exclusively draws from the black ink cartridge. This is great if you:
- Have low or empty color cartridges but still need to print
- Are printing large volumes of text documents or receipts
- Want to stretch your color ink as long as possible
- Are printing drafts and don’t need anything fancy
Once you understand the “why,” the fix makes a lot more sense.
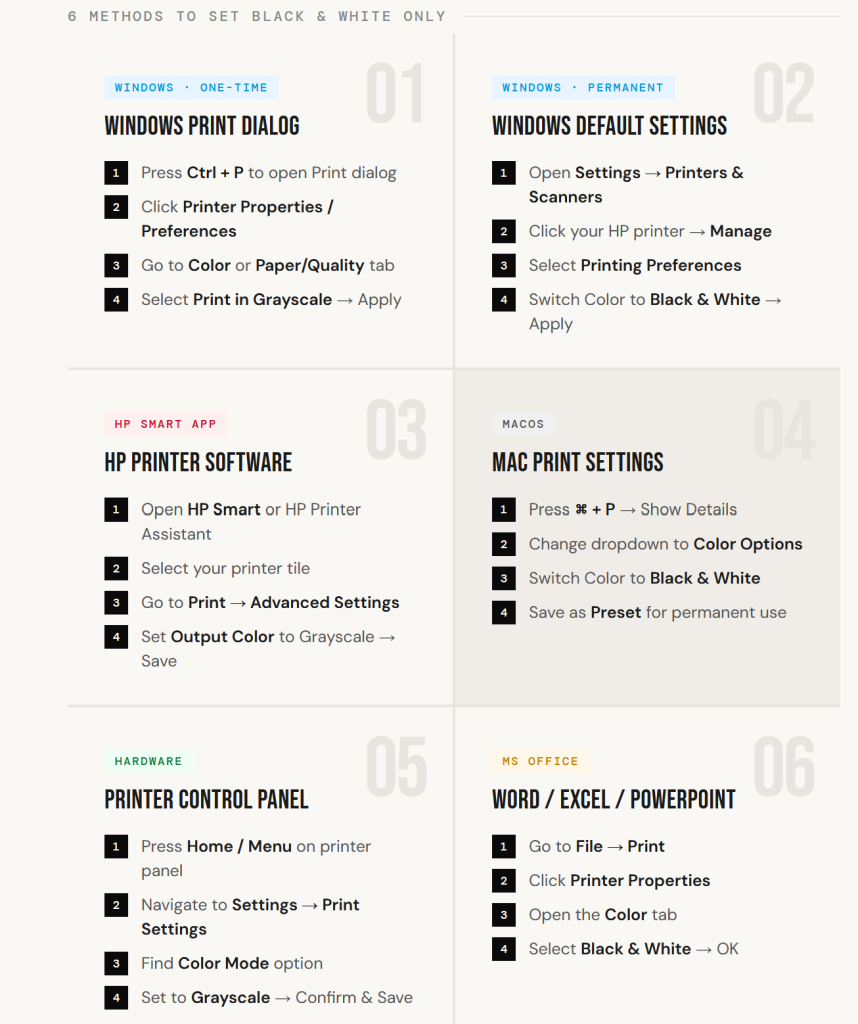
Method 1: Setting Black and White Print from the Windows Print Dialog
This is the quickest way to print in black and white for a single document, and it works for most HP printers on Windows 10 and Windows 11.
Here’s how to do it:
- Open the document you want to print, whether it’s a Word file, PDF, browser page, or anything else.
- Press Ctrl + P on your keyboard to open the Print dialog.
- Make sure your HP printer is selected in the printer dropdown at the top.
- Look for a link or button that says “Printer Properties,” “More Settings,” or “Preferences”, this varies slightly depending on your application.
- Once the HP printer preferences window opens, navigate to the “Color” tab or the “Paper/Quality” tab.
- You’ll see an option like “Print in Grayscale” or “Black & White”, select it.
- Click OK or Apply to save, then hit Print.
That’s it for a one-time black and white print. But if you want every single print job to default to black and white automatically, keep reading, the next method covers that.
Method 2: Changing the Default Print Settings to Black and White (Windows)
If you’re tired of switching the setting every time you print, you can permanently change your HP printer’s default to black and white. This way, every print job will automatically be in grayscale unless you manually change it for a specific job.
Follow these steps:
- Open the Start Menu and go to Settings (the gear icon).
- Navigate to Devices > Printers & Scanners (on Windows 10) or Bluetooth & devices > Printers & Scanners (on Windows 11).
- Click on your HP printer from the list.
- Select “Manage” and then click on “Printing Preferences.”
- In the preferences window, go to the “Paper/Quality” tab or the “Color” tab.
- Find the “Color” section and switch it from “Color” to “Black & White” or check the box that says “Print in Grayscale.”
- Click Apply, then OK.
From this point on, every document you send to that HP printer will default to black and white. You won’t need to change it each time.
Method 3: Using the HP Printer Software (HP Smart or HP Printer Assistant)
HP provides its own printing software, either the HP Smart app or the older HP Printer Assistant, and both give you additional control over your print settings, including the color mode.
Using HP Smart App:
- Open the HP Smart app on your computer (download it from hp.com if you don’t have it).
- Click on your printer tile to select it.
- Click on “Print” and then open “Advanced Settings” or “Printer Settings.”
- Look for the Color mode or Output color option and change it to Grayscale or Black and White.
- Save the settings.
Using HP Printer Assistant:
- Open the HP Printer Assistant from your desktop or Start menu.
- Go to “Printer Settings” or “Printer Preferences.”
- Navigate to the Print Settings or Color section.
- Switch the color setting to “Print in Grayscale” or “Black & White Only.”
- Click OK or Apply.
This method is particularly useful if you regularly use HP’s own software to manage print jobs, as it gives you a centralized place to manage all your printer behavior.
Method 4: Setting Black and White Print on a Mac
Mac users aren’t left out. The process is straightforward, though the menus look a bit different from Windows.
Here’s how to do it on macOS:
- Open the document you want to print and press Command + P to open the Print dialog.
- Make sure your HP printer is selected.
- Click “Show Details” if the full print options aren’t visible.
- Find the dropdown menu in the middle of the Print dialog (it usually says something like “Copies & Pages”) and change it to “Color Matching” or “Color Options”, depending on your macOS version.
- You’ll see a “Color” section, switch it to “Black & White” or “Grayscale.”
- Click Print.
To make this the permanent default on Mac:
- After adjusting the settings, click the “Presets” dropdown at the top of the Print dialog.
- Select “Save Current Settings as Preset.”
- Name it something like “Black & White Default” and save.
- Next time you print, select this preset from the dropdown to instantly apply black and white settings.
Method 5: Changing Print Mode Directly from the HP Printer’s Control Panel
Some HP printer models, particularly all-in-one printers and larger office-grade models, have a touchscreen or button-based control panel that lets you adjust settings directly on the device, without going through your computer at all.
Here’s the general process (this may vary slightly by model):
- Press the Home button or Menu button on your HP printer’s control panel.
- Navigate to Settings or Preferences using the arrow buttons or the touchscreen.
- Look for Print Settings or Default Settings.
- Find the Color or Color Mode option.
- Change it from Color to Black & White or Grayscale.
- Confirm and save the setting.
This is especially handy if your printer is shared among multiple users and you want to ensure the hardware-level default is set correctly regardless of which computer is sending the print job.
Method 6: Setting Black and White in Microsoft Word, Excel, or PowerPoint
If you regularly print from Microsoft Office applications, you can set the print color directly within the application itself, without digging into printer settings every time.
In Microsoft Word:
- Go to File > Print.
- Under the printer name, click “Printer Properties” or “Page Setup.”
- In the printer properties window, go to Color settings and select Grayscale or Black & White.
In Microsoft Excel or PowerPoint:
- Go to File > Print.
- Click on “Printer Properties” below the printer name.
- Switch to the Color tab and set it to Black & White.
This method is application-specific, meaning the setting will only apply when printing from that particular Office program.
Troubleshooting: HP Printer Still Printing in Color
Sometimes, even after you’ve changed the settings, your HP printer stubbornly keeps printing in color. Here are a few things to check:
The setting wasn’t saved properly. Go back through the steps and make sure you clicked “Apply” before clicking “OK.” It’s a surprisingly common slip.
The application is overriding the printer settings. Some apps like Chrome or Adobe Acrobat have their own color settings that can override what you set in the printer preferences. Always check the print dialog within the specific app you’re using.
The printer driver is outdated. An old or corrupted printer driver can cause settings not to stick. Visit hp.com/support, enter your printer model, and download the latest driver.
The HP Smart app is synced to old settings. If you use HP Smart, try logging out and back in, or resetting the app’s print preferences.
Your document itself is set to color output. In applications like Photoshop or InDesign, the document’s own color mode can affect print output. Make sure you’re not exporting to a color format before printing.
Quick Tips to Save Even More Ink
Now that you’ve switched to black and white printing, here are a few extra tricks to get even more out of your cartridges:
- Use Draft Mode for everyday documents. It uses less ink per page and prints faster.
- Avoid printing backgrounds and images when they’re not necessary.
- Print multiple pages per sheet when reading drafts or reference material.
- Use your printer’s Economy or Toner Save mode if available. Many HP models have this option in the same preferences menu.
Final Thoughts
Switching your HP printer to black and white only is one of those small changes that quietly saves you a surprising amount of money over time. The steps are simple once you know where to look, and the whole process takes less than two minutes regardless of which method you use.
If you’re on Windows, the most reliable approach is to update the default printer preferences through the Printers & Scanners settings so you never have to think about it again. If you’re on a Mac, saving a grayscale preset works just as well.
Either way, your color cartridges will thank you.
Have questions about your HP printer settings or ran into an issue not covered here? Drop a comment below, we’re happy to help.