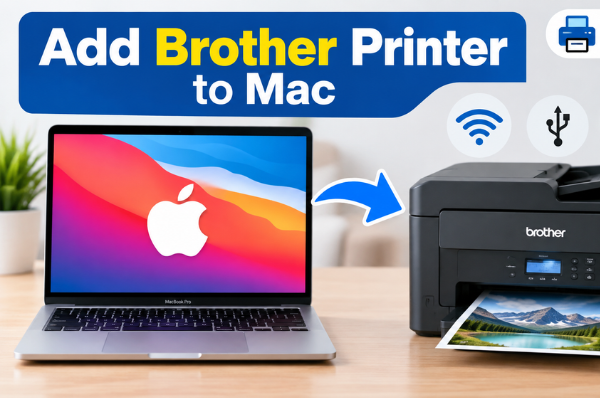

Adding a Brother printer to a Mac is usually straightforward once the printer is connected correctly. You can connect a Brother printer using Wi-Fi, USB, or a wired network connection, and then add it through the Printers & Scanners section in macOS.
The exact screens can vary depending on your Brother printer model and macOS version, but the basic process is similar.
In this guide, you will learn how to add a Brother printer to Mac, how to choose the correct printer software or AirPrint option, and what to do if your Brother printer does not appear in the printer list.
Quick answer: On a modern Mac, go to Apple menu → System Settings → Printers & Scanners → Add Printer, Scanner, or Fax, select your Brother printer, check the Use option, and click Add. Brother documents this process for macOS 13 and later.
What You Need Before Adding a Brother Printer to Mac
Before starting the setup, make sure you have:
- Your Brother printer
- A Mac computer
- The printer’s power cable
- A USB cable if you are using USB
- An Ethernet cable if you are using a wired network
- A working Wi-Fi network if you are setting up the printer wirelessly
- The Brother printer turned on and ready to use
For wireless printing, your Brother printer should be connected to the network that your Mac can access. Apple recommends that an AirPrint-enabled printer and Mac be connected to the same Wi-Fi network for wireless printing.
How to Add a Brother Printer to Mac
Follow these steps to add your Brother printer to your Mac.
Step 1: Prepare Your Brother Printer
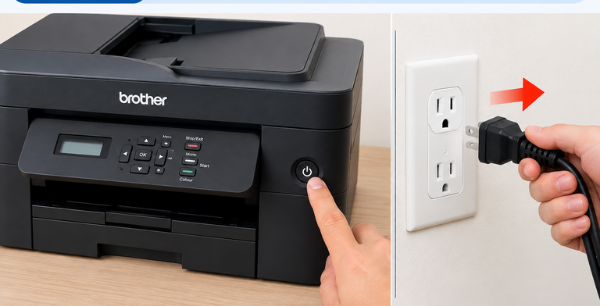
First, turn off your Brother printer and disconnect it from the power outlet if you are following the initial hardware setup procedure.
If an unnecessary interface cable is connected, disconnect it as well.
This step comes from Brother’s installation procedure for older macOS driver-based setups. For a printer that is already correctly connected and configured, you normally do not need to unplug everything before adding it through macOS.
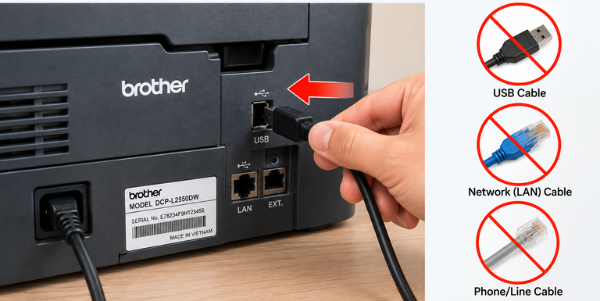
Step 2: Choose Your Connection Type
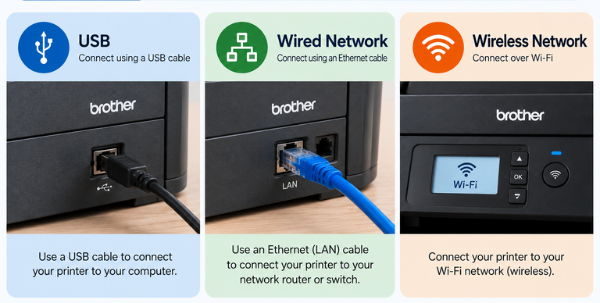
Next, decide how you want to connect the Brother printer to your Mac.
You generally have three options:
- USB connection
- Wired network connection
- Wireless network connection
The available options depend on your specific Brother printer model.
Step 3: Connect the Brother Printer Using USB
If you are using a USB connection, connect the Brother printer to a power outlet and turn it on.
Then connect the printer directly to your Mac using a compatible USB cable.
Once connected, macOS may detect the printer automatically. If it does not appear immediately, continue to the printer-add process through System Settings → Printers & Scanners.
Apple notes that a USB connection can also sometimes be used as part of the initial Wi-Fi setup, depending on the printer and its software.
Important USB tip
If your Mac does not have the required USB port, you may need a compatible adapter or hub.
Step 4: Connect the Brother Printer to a Wired Network
If your Brother printer supports Ethernet networking, connect a network cable from the printer to your router, network switch, or hub.
Then connect the printer to power and turn it on.
A wired network connection can be useful when you want the printer to communicate with computers over your local network without using Wi-Fi.
After the printer is connected to the network, you can add it through Printers & Scanners on your Mac.
Apple’s current Mac guidance supports printers connected through Ethernet as well as Wi-Fi, USB, and other compatible connection methods.
Step 5: Connect the Brother Printer to Wi-Fi
For wireless printing, turn on your Brother printer and complete its wireless network setup.
The exact Wi-Fi setup process depends on your Brother printer model. Some Brother printers have a display that lets you select the Wi-Fi network and enter the password, while other models use a different setup method.
After setup, make sure the printer is connected to your network.
For AirPrint printing, Apple recommends connecting the printer and Mac to the same Wi-Fi network.
Why the same Wi-Fi network matters
If your Mac is connected to one network while the Brother printer is connected to another isolated network, your Mac may not discover the printer automatically.
If the printer does not appear, check the Wi-Fi connection on both devices before changing printer settings.
Step 6: Open System Settings on Your Mac
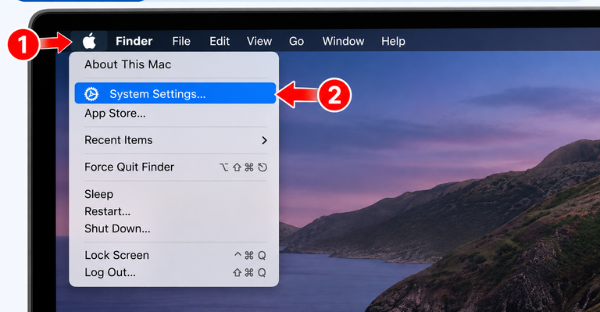
Now move to your Mac.
Click the Apple menu in the top-left corner.
Select System Settings.
On current versions of macOS, printer management is handled through Printers & Scanners rather than the older System Preferences interface. Brother’s current instructions for macOS 13 and later use this same path.
Step 7: Open Printers & Scanners
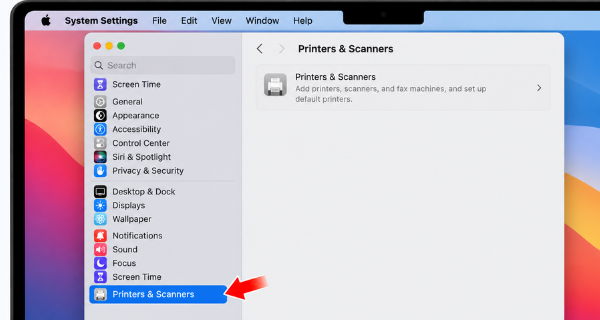
Inside System Settings, scroll through the sidebar and select:
Printers & Scanners
You will see the printers that are already configured on your Mac.
If your Brother printer has not been added yet, you can add it from this screen.
Step 8: Click Add Printer, Scanner, or Fax
Click: Add Printer, Scanner, or Fax
Your Mac will open the printer-add window and search for available devices.
Depending on your connection, your Brother printer may appear with its model name, network name, or another identifying name.
Brother’s current macOS instructions specifically direct users to select Add Printer, Scanner, or Fax on macOS 13 and later.
Step 9: Select Your Brother Printer
Look through the available printers and select your Brother printer.
Make sure you choose the correct device if multiple printers are listed.
If your Brother printer does not appear, don’t worry. There are several troubleshooting steps later in this guide that can help.
Step 10: Check the “Use” Option
After selecting the printer, look for the Use menu.
This is an important part of the setup.
Depending on your Brother printer model and macOS version, you may see an appropriate Brother printer software option or AirPrint.
Brother’s current instructions tell macOS users to select their Brother machine and then choose the appropriate model name from the Use pop-up menu.
What is AirPrint?
AirPrint is Apple’s driverless printing technology. When a printer supports AirPrint, you generally don’t need to install an additional printer driver just to print from a Mac.
However, do not assume that every Brother printer should be set to AirPrint. The available options depend on the specific printer and macOS version.
If your Brother model appears as an available printer software option, use the appropriate option for your printer.
Step 11: Click Add
After checking the printer and Use option, click Add.
macOS will add the Brother printer to your printer list.
The printer should now appear under Printers & Scanners.
Step 12: Test the Brother Printer
Your Brother printer has now been added to your Mac.
To make sure everything works correctly, open a document or photo and select Print.
Choose your Brother printer from the list and send a test print.
If the page prints correctly, the setup is complete.
Apple also provides a printer-management option for printing a test page from the Mac’s printer management tools.
Brother Printer Not Showing on Mac? Try These Fixes
Sometimes the Brother printer does not appear in the Add Printer window.
Try these solutions one at a time.
1. Check That the Printer Is Turned On
Make sure the Brother printer is powered on and ready.
If the printer displays an error, paper jam, low-ink warning, or another problem, resolve that issue first.
Then try adding the printer again.
2. Check the Wi-Fi Connection
If you are using wireless printing, check the printer’s network connection.
Your Mac should also be connected to the appropriate network.
For AirPrint, Apple recommends that the Mac and printer be connected to the same Wi-Fi network.
3. Restart the Printer
Turn off the Brother printer.
Wait a few seconds and turn it back on.
Then return to:
Apple menu → System Settings → Printers & Scanners
Try adding the printer again.
4. Restart Your Mac
A simple restart can refresh network and printer detection.
Restart your Mac and try:
System Settings → Printers & Scanners → Add Printer, Scanner, or Fax
again.
5. Restart Your Router
If the Brother printer is connected through Wi-Fi and cannot be discovered, restart your router.
Wait for the network to become available again, then check the printer’s network connection.
6. Check the USB Cable
For USB connections, make sure the cable is firmly connected to both the printer and Mac.
If possible, try another compatible cable or USB port.
7. Check the Brother Printer Software
If the printer requires Brother-specific software or drivers, make sure you are using software appropriate for your printer model and macOS version.
Brother provides model-specific support and software through its support website.
8. Remove and Add the Printer Again
If your Brother printer is already listed but is not working correctly, you can remove it from the printer list and add it again.
Open:
Apple menu → System Settings → Printers & Scanners
Select the Brother printer and use the available remove option.
Then click Add Printer, Scanner, or Fax and set it up again.
Should You Use AirPrint or Brother Printer Software?
This depends on your printer.
AirPrint is convenient because it provides driverless printing on supported printers. Apple says AirPrint is built into many popular printer models and does not require additional drivers or software for supported use cases.
However, Brother-specific software may provide additional functions depending on your model.
For example, advanced printer features or model-specific functions may require Brother software.
The safest approach is to check the Use menu during setup and follow the option recommended for your particular Brother printer model.
How to Add an Older Brother Printer to Mac
If you are using an older version of macOS, the interface may look different.
For example, Brother’s instructions distinguish between newer macOS versions and older versions.
On macOS 13 or later, Brother directs users to:
Apple menu → System Settings → Printers & Scanners → Add Printer, Scanner, or Fax
On macOS 12 or earlier, the process uses System Preferences, and older versions may use the + button to add a printer.
This difference is important if you are following an older YouTube video or website guide.
Why Can’t My Mac Find My Brother Printer?
There are several possible reasons.
The most common include:
- The printer is turned off.
- The printer has not completed Wi-Fi setup.
- The Mac and printer are not connected to the same network.
- The printer is too far from the wireless router.
- A USB cable is disconnected or incompatible.
- The printer requires model-specific software.
- The printer is experiencing a network or hardware error.
- The printer has not been added correctly in macOS.
Start with the basics: turn on the printer, check its connection, restart the printer and Mac, and then try Printers & Scanners again.
Can I Add a Brother Printer to Mac Without a Driver?
Yes, if the Brother printer supports AirPrint or another driverless printing method compatible with macOS.
Apple says AirPrint-enabled printers can print without additional drivers or software.
However, not every Brother printer supports the same features. If your printer does not support the required driverless functionality, you may need Brother’s software or driver for your specific model.
Can I Connect a Brother Printer to Mac Using Wi-Fi?
Yes.
A compatible Brother printer can be connected to your wireless network and then added through:
Apple menu → System Settings → Printers & Scanners → Add Printer, Scanner, or Fax
For AirPrint, the printer and Mac should be on the same Wi-Fi network.
Can I Connect a Brother Printer to Mac Using USB?
Yes, if the Brother printer supports USB connectivity.
Connect the printer to your Mac using a compatible USB cable, turn on the printer, and then check:
System Settings → Printers & Scanners
If the printer is not automatically available, select Add Printer, Scanner, or Fax.
Apple also notes that USB can sometimes be used temporarily to configure a compatible printer for Wi-Fi printing.
Frequently Asked Questions
How do I add a Brother printer to my Mac?
Go to Apple menu → System Settings → Printers & Scanners → Add Printer, Scanner, or Fax. Select your Brother printer, choose the appropriate option under Use, and click Add.
Why is my Brother printer not showing up on my Mac?
Check that the printer is powered on and properly connected. For wireless printing, check that the printer and Mac are connected to the same Wi-Fi network. Then restart the printer and Mac and try adding the printer again.
Does Brother printer work with Mac?
Many Brother printers work with Mac, but compatibility and available features depend on the specific Brother model and macOS version. Check Brother’s support information for your exact model.
Do I need Brother drivers on Mac?
Not necessarily. If your printer supports AirPrint, you can generally print without installing additional drivers. Some models or advanced functions may require Brother software.
Where are printer settings on a Mac?
On current macOS versions, open Apple menu → System Settings → Printers & Scanners.
How do I connect a Brother printer to MacBook?
You can use Wi-Fi, USB, or a supported wired network connection. After connecting the printer, open System Settings → Printers & Scanners, select Add Printer, Scanner, or Fax, and complete the setup.
How do I test my Brother printer after adding it?
Open a document or photo, choose Print, select your Brother printer, and print a test page or document. macOS also provides printer-management options for testing a configured printer.
Final Thoughts
Adding a Brother printer to a Mac is usually a simple process once the printer has been connected correctly.
For modern macOS versions, the main path to remember is:
Apple menu → System Settings → Printers & Scanners → Add Printer, Scanner, or Fax → Select Brother Printer → Check “Use” → Add
If you’re using Wi-Fi, make sure the Brother printer is connected to the appropriate network. If you’re using USB, check the cable and connection. If the printer still does not appear, restart the printer and Mac and verify the printer’s network settings.
The exact setup options can vary between Brother models, so if your printer displays different choices, use the instructions specific to your model.
For additional model-specific information, you can check Brother Support and Apple Support.