You just sent a document to print, the printer shows it is connected, your computer says everything is fine, and yet nothing comes out. No paper moves, no ink hits the page, and there is no obvious error telling you what went wrong. If you own a Brother printer, this situation is frustratingly common, and it catches a lot of people off guard precisely because the connection looks perfectly fine on the surface.
The good news is that this problem almost always has a fixable cause. In most cases, it comes down to one of a handful of issues: a stuck print queue, a wrong default printer, an outdated driver, or a communication breakdown between your computer and the printer. None of these require technical expertise to solve. You just need to know where to look.
This article walks through each possible cause in a logical order, starting with the simplest fixes and moving toward the more involved ones. Work through them step by step and you will likely have your printer working again before reaching the end.
Start With the Obvious: Check the Printer Itself
Before touching your computer settings, spend thirty seconds looking at the printer directly. A connected printer that refuses to print is sometimes telling you something through its own display or indicator lights.
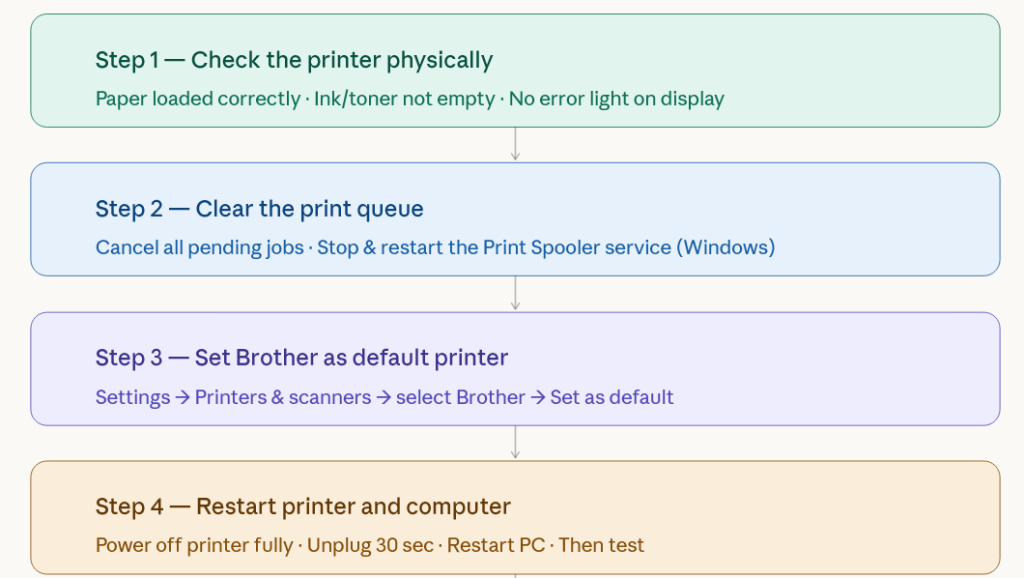
Check whether the printer has paper loaded properly. Even one sheet that is slightly misaligned can cause the printer to pause and wait without giving a clear error. Open the paper tray, remove the stack, tap it on a flat surface to align the edges, and reload it snugly within the guides.
Check the ink or toner levels. Brother printers will often stop printing entirely when a cartridge runs out, even if the other colors are full. The printer might show an ink warning on its screen, or it might just sit quietly and do nothing. If a cartridge is empty or very low, replace it before continuing.
Also check whether the printer is in any kind of error or sleep state. Press the go or resume button if you see one. If the display shows a message you do not recognize, write it down because it may be useful later.
Clear the Print Queue
A stuck print queue is one of the most common reasons a Brother printer stops responding even though it appears connected. Documents can get trapped in the queue in a state where they are neither printing nor canceling, and new print jobs pile up behind them with nowhere to go.
To clear the queue on Windows, open the Start menu and type “Printers and scanners” then click on it. Find your Brother printer in the list and click on it. Select “Open print queue.” You will see any pending jobs listed there. Right-click each one and choose “Cancel.” If they do not cancel, you may need to use a slightly more forceful method.
The more forceful method involves stopping the Windows print spooler service, deleting the stuck files manually, and restarting the service. Here is how to do it. Open the Start menu, search for “Services,” and open it. Scroll down to “Print Spooler,” right-click it, and choose “Stop.” Now open File Explorer and navigate to this folder: C:\Windows\System32\spool\PRINTERS. Delete everything inside that folder but do not delete the folder itself. Go back to Services, find Print Spooler again, right-click it, and choose “Start.” Then try printing again.
On a Mac, go to System Settings, click on Printers and Scanners, select your Brother printer, and click “Open Print Queue.” Delete any stuck jobs from there. If jobs are stuck and will not delete, you can restart the printing system entirely by right-clicking in the printer list area and choosing “Reset printing system.” Keep in mind this removes all printers from your list, so you will need to add your Brother printer back afterward.
Make Sure Your Brother Printer Is the Default Printer
Sometimes your computer is sending print jobs to a completely different printer, and that is why nothing comes out of your Brother. This happens more often than most people realize, especially after installing a new printer, updating Windows, or using a virtual printer like Microsoft Print to PDF.
On Windows, go to Settings, then Bluetooth and devices, then Printers and scanners. Look for a setting called “Let Windows manage my default printer” and if it is turned on, turn it off. Then scroll through the list of printers, click on your Brother model, and select “Set as default.” A checkmark should appear next to it.
On a Mac, go to System Settings, click Printers and Scanners, and look at the “Default printer” option at the bottom of the screen. Click the dropdown and choose your Brother printer.
Once you have set the correct default, try printing a test page.
Restart Both the Printer and the Computer
This sounds too simple to matter, but it genuinely fixes the problem more often than it should. When a printer and a computer have been running for a long time, communication channels can get into a confused state. A full restart of both clears that confusion.
Turn the Brother printer off completely using the power button. Do not just put it to sleep. Unplug it from the wall, wait about thirty seconds, then plug it back in and turn it on. Let it fully initialize before you do anything else.
Restart your computer as well. After it comes back up, wait for everything to settle, then send a print job and see if the situation has changed.
Check the Connection Method
How your printer is connected matters, and problems in the connection itself will cause exactly this symptom: the printer shows as connected but does not print.
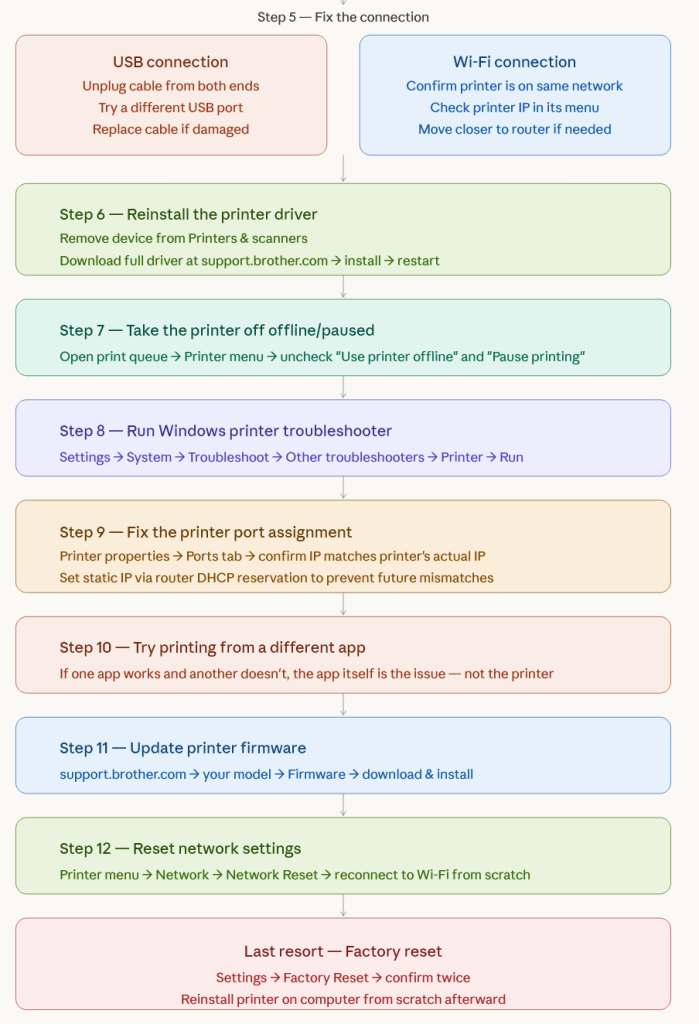
If you are using a USB cable, unplug it from both the printer and the computer, wait a few seconds, and plug it back in. Try a different USB port on your computer if one is available. Also inspect the cable itself for any damage. USB cables that look fine on the outside can have internal breaks that cause intermittent connection issues.
If you are connected over Wi-Fi, start by checking whether your printer is actually on the same network as your computer. It is easy for a Brother printer to accidentally reconnect to a guest network or a neighbor’s network if your own network was unavailable at startup. On the printer’s display, navigate to the network settings and confirm the IP address it is using. You can compare this to your computer’s network to make sure they match.
If the IP address looks wrong or the printer keeps dropping from the network, try moving the printer closer to your router temporarily to rule out a signal strength problem. Also check whether your router has assigned a different IP address to the printer than it had before, which can happen if the printer’s network lease expired.
If you are using a Brother printer shared over a network from another computer, make sure that host computer is on and has not had its sharing settings changed.
Reinstall or Update the Printer Driver
An outdated or corrupted driver is a very common cause of a Brother printer that connects but will not print. The driver is the software that allows your operating system to communicate with the printer, and if it is broken or incompatible, the printer simply will not respond to print commands.
Start by removing the existing driver. On Windows, go to Settings, then Printers and Scanners, click on your Brother printer, and choose “Remove device.” Then open the Start menu, search for “Device Manager,” and look under “Printers” to see if the Brother printer still appears there. If it does, right-click it and uninstall it, making sure to check the box that says “Delete the driver software for this device.”
Once the old driver is gone, go to the Brother support website at support.brother.com. Enter your printer model and download the full driver package for your operating system. Run the installer and follow the instructions. After installation, restart your computer and try printing again.
On a Mac, the process is similar. Remove the printer from Printers and Scanners settings, then go to the Brother support site and download the correct driver for your macOS version. Brother has a specific driver for Apple Silicon Macs and a different one for Intel Macs, so pay attention to which version of macOS and which chip your Mac uses.
Check the Printer Status in Your Operating System
Your computer maintains a record of the printer’s status, and sometimes that record gets out of sync with reality. The printer shows as “offline” or “paused” in your system even though it is actually powered on and ready.
On Windows, go to Settings, Printers and Scanners, and click on your Brother printer. Choose “Open print queue.” In the window that opens, click the “Printer” menu at the top. If you see options like “Use Printer Offline” or “Pause Printing” with a checkmark next to them, click those options to turn them off. The printer should switch to an online, active state.
On a Mac, open the print queue from Printers and Scanners and look for any status message below the printer name. If it says “Paused,” there will be a Resume button. Click it.
Run the Brother Printer Troubleshooter (Windows)
Windows includes a built-in troubleshooter for printers that can sometimes catch and fix issues automatically. It is worth running even if you are skeptical of automated tools.
Go to Settings, then System, then Troubleshoot, then Other troubleshooters. Find “Printer” in the list and click “Run.” The troubleshooter will scan for problems and walk you through any fixes it finds. It does not catch everything, but it does handle a range of common issues including incorrect port assignments, spooler problems, and driver conflicts.
Check the Printer Port Assignment
This is a slightly more technical step, but it is worth checking if nothing else has worked. Your computer connects to the printer through a specific port, and if that port assignment is wrong or has changed, print jobs will go nowhere.
On Windows, go to Settings, Printers and Scanners, click your Brother printer, and choose “Printer properties.” Go to the “Ports” tab. You will see a list of ports with one selected. For a USB printer, it should be a port labeled something like USB001 or USB002. For a network printer, it should show an IP address that matches your printer’s actual IP address.
If the IP address in the port settings does not match the printer’s current IP, you have two choices. You can update the port to point to the correct IP address by clicking on it and choosing “Configure Port.” Or, even better, you can set your router to always assign the same IP address to your Brother printer using a feature called DHCP reservation or static IP assignment. This prevents the mismatch from happening again.
Try Printing From a Different Application
Sometimes the issue is not with the printer at all but with a specific application behaving oddly. If you have been trying to print from one program and nothing happens, try printing from a different one. For example, if you are trying to print from Microsoft Word, try opening a simple document in Notepad or a PDF in your browser and print from there.
If printing works from some applications but not others, the problem is in that specific application’s settings or installation, not the printer itself.
Check for Firmware Updates
Brother periodically releases firmware updates for its printers that fix bugs, improve compatibility, and address connectivity problems. If your printer has outdated firmware, it may have trouble communicating properly with newer operating systems or network equipment.
To check for firmware updates, go to the Brother support website, search for your printer model, and look for firmware downloads. The page will tell you the current version and provide update instructions. On many Brother models, you can also trigger a firmware check directly from the printer’s menu under Settings or Machine Information.
Reset the Printer’s Network Settings
If you are using your Brother printer over Wi-Fi and have tried everything else, resetting the network settings on the printer and setting it up fresh can clear persistent connection problems that nothing else resolves.
The exact steps vary by model, but on most Brother printers you can find a network reset option under Menu, then Network, then Network Reset. Confirm the reset when prompted. After the reset, the printer will forget its Wi-Fi password and IP assignment. You will need to connect it to your Wi-Fi network again by going through the wireless setup process in the printer’s menu.
Once it reconnects, give it a minute to establish its connection fully, then send a test print.
When to Consider a Factory Reset
A factory reset restores the printer to the state it was in when it left the manufacturer. This clears every setting, every stored network, and every customization you have made. It is a last resort, but if the printer has a persistent internal issue that nothing else has resolved, it is sometimes the only way to start clean.
On most Brother printers, a factory reset option is available under the Settings or Initial Setup menu. Look for an option called “Factory Reset” or “All Settings.” Confirm twice when prompted, as the printer will warn you that everything will be erased.
After the reset, you will need to reinstall the printer on your computer from scratch, just as you did when you first got it.
Summary
A Brother printer that shows as connected but refuses to print is rarely a sign of a serious hardware failure. In the vast majority of cases, the cause is a software or configuration issue: a frozen print queue, the wrong default printer, a driver that needs reinstalling, or a network address that has quietly changed. Start with the simplest checks, clear the queue, confirm your printer is set as default, restart both devices, and work your way through the connection and driver steps from there.
Most people find their answer somewhere in the first half of this list. If you have worked through everything above and the printer still will not respond, contacting Brother’s support team directly is your next step. They can assist with model-specific issues and, if necessary, help you determine whether the problem is with the hardware itself.